Saturday, April 25, 2009

Creating the laced closure 1

Okay, let's start working on the laced or corset closure,
Traditionally this is located on the back. howerver you can also place them anywhere you want.
(I made them with front closures when I costumed The Rocky Horror Show, specifically the floorshow corsets are gorgeous in my opinion)

The pieces we'll be working on are all pattern pieces of the centre back.
(2 outer layers, 2 lining, as in the picture below.)


The beginning is actually a lot similar to the busk insertion process.
First start by sewing the corresponding outer layers and lining together along the back seam.
(in most cases, along the straight lined edge of the fabric pieces)
The like before, press open en flat starting on the inside.

After you have done this, you can fold the pieces and press them in the final position.
Do not press it exactly on the seam, but but press it a 1/8 inch (or 2mm) to the side of the seam. This will result in a small piece of the outer layer to turn to the inside of the garment.
(as in the picture below)


When you do this, you can be certain that no lining will show when laced up.

When you have done all this it is also important to trim the seam allowance like we did before.
(See my earlier post Inserting the busk 1 if you need more explanation)

Okay now like before, we need to sew a seam along the pressed border. Topstitch just 1/8 inch or 2 mm from the edge, as seen in the picture below.


Now it is time to start cutting a few pieces of boning. use flat steel boning for this type of closure.
Spiral steel boning is not advised for this.

I personally like to cut my bones, so they have enough room to slightly move up and down in the boning channel. If you cut them to long they will come tearing through the corset.

Use a pair of wire cutters (or anything that works) and cut the bones.
Don't try and cut them through at once, since this is impossible on a hand cutter.
Try to cut them a couple of times, and very gently try bending it on the place where you've made a cut. Don't use excessive force for this, cause to much bending will result in a curved ending to your bone, which is undesired. If it won't snap immediatly, try cutting it again.


Okay now that we've got the bones cut, it is important to create nice rounded edges to them.
This makes them easier to insert, makes for nicer wear, and protects the final corset from damage.

Either use a sanding stone, or if you don't have one, you can also cut the sharp corners off with the wire cutters and sand them down by hand.


Both my spiral and steel bones are 7 mm. this creates a nice and even effect.
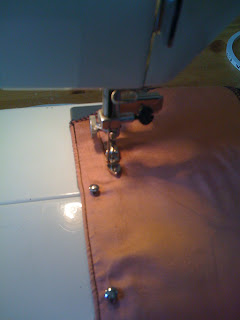
Notice in the picture below, that I have place the bone under the sewing machine foot.
This is just so I can see that the left side of my foot matches up with the width of the bones.
You'll probably find something similar on most machines.

Okay now it's time to start sewing our first boning channel. Don't start with the actual bone placed under your foot like the picture above. remove the bone and start sewing following the earlier made stitching.

Once you've sewn one boning channel, test it's width by partially inserting one of the bones.
If it fits nice and snug continue sewing the other channel.
You should end up with something like the picture below.


Now we need to sew two more boning channels running parallel to the first.
However but since our eyelets are going to be placed in between these pieces of boning, we'll need to leave a space for them.

Now the eyelets I'm using on the corset are 4mm in diameter. I think you also call them size 0 in other countries.
Now the width of the space between the boning channels will depend on your eyelets and your personal taste. However don't make it to wide.

Once you've decided the placing of the second boning channel. start sewing.
You can take your last made seam as a gauge. however it is probably better to stick down a piece of tape on your machine at the desired distance, and simply follow that.
(See Cutting pattern pieces and preparing your machine)


After sewing the first seams you should have something that looks like this:

Okay now sew the last seams and create the boning channels.

Insert the four pieces of boning.


As in the picture below, the bones should sit nice and snug in their channels.

For now we are finished with the back closure. Inserting the eyelets and the lacing will come at final end of assembly.

Let's se what we've achieved..


Beautifull.

Let's continue...

Tuesday, April 21, 2009

Corset making 101: Inserting the busk 2

Okay, now that you have stuck the hooks through the side seam, mark the placement of the hooks on the outer layer with pins (as shown on the picture below)

Now take the busk out again. Do not remove the pins.
You now need to sew an edge seam. which is located just an 1/8 inch (2mm) of the edge of the fabric piece. do not sew where the hooks are to be placed.
The next two pictures will make clear the exact placement of this seam.

Notice in the above picture. The right patern piece can be sewed in a single continuous seam.

Now this has all been preparation, now we are going to place the actual busk.
First insert the left busk piece (with the hooks) and pin in place.
Place the right pattern piece next to it.


Now take a pencil and mark through the holes in the hooks the spot where the corresponding right busk pins need to come.


Take a sharp pointy device (awl) and pierce throught the markings on the right fabric piece.
Only pierce the top layer and not the lining. Do not punch or cut the holes!
By using an awl, you'l create the hole without cutting any threads in the fabrics.


Once you have pierced all the holes like the picture above, simply insert the right busk piece and gently force the pins through.

Pin the right busk in place.
Now it is time to permanently fix the busk into place. we need to place a seam on the position of the pins. I personally find this the most trickiest seam when making a corset.
On this specific piece I tried seven attempts before getting a satisfactory result.

When you try sewing this seam use a blind/hidden zipper foot. You need to sew as close to the busk as possible to get a nice result. and remember les stops equals better results.

Notice in the following picture I use a different sewing machine for this action. Since my industrial sewing machine does not have a zipper foot.


Sew both left and right busk into place.

You have now succesfully inserted a busk, congratulations!
That was the hard part.

Let's continue...

Corset making 101: Inserting the busk 1

Note: this is an optional step. a busk is not essential to a corset.

Now that we've got our pattern pieces cut out and prepared, we can start assembling the corset.
Always start making the closures first. in this case we will start with the front busk closure, which is probably one of the trickiest things to sew when making a corset.

First let's take a look at the pieces we'll be working with.

All four fabric pieces of the front of the corset, and the busk itself.

Traditionally the busk hooks go on the left side of the corset, however there is no reason why you shouldn't switch this around if you want to.

The busk will be placed inside the two corset layers. however the hooks will have to stick out of the side seam. To do this take the left pattern pieces (outer layer and lining) and pin them with the right sides onto eachother.
Now with a crayon or marker mark the place where the hooks will be placed

Sew the two pattern pieces together, but dont sew where the hooks are supposed to come.

The right side of the busk does not have hooks portruding out of the seam. you can easily sew those pattern pieces together in one continues seam.

Now press all seams flat on both sides . startin with the inside.

After it is flat, you can fold it over and press it (pressing it flat first creates a nicer result.)
make sure not to press it exactly on the fold, but turn a milimeter of the outer layer to the inside.
(see picture below) this makes sure none of the lining will show when wearing the corset.


Next: notice how you can clearly see the bulge of the seam allowance on the next picture,


This is not nice and therefor we will need to trim the seam allowance,
Now cut of a sliver of fabric (5mm) of one of the pieces of seam allowance) usually the lining piece. (the widest piece of seam allowance needs to lie over the thinnest.)
look at the following pictures to make it more clear, and notice the reduced bulge in the final picture.


Now that you've pressed and thinned out both pieces insert the left busk piece and lay next to eachother.


Beautifull.
Let's continue...

Corset making 101: Cutting pattern pieces and preparing your machine.

Now that we've got our final pattern. let's cut it out of fabric.
The corset will consist of three layers of fabric.
(one outer layer, and two layers of stiff cotton)
and since each pattern piece is mirrored on each half of the corset, you will need to cut each pattern six times. (four times out of cotton and two times out of your outer fabric)

If you are making a corset with an outer layer of striped fabric, take special care in cutting the fabric so the stripes match up (see Julia's corset)


Once you have cut everything, take all the silk pieces and and serge (or sew) them onto a corrseponding piece of cotton as show in the picture above.

Now you've got your outer fabric piece, which looks delicate and flimsy, but is strong because of the cotton attached.


You now have four pieces left for each pattern. 2 mirrored outer and inner layers as seen on the picture above. the black pieces on the picture are the single layers of cotton which will be used as the lining. Notice that I also serge these lining pieces.

Let's start preparing your sewing machine.
Use a piece of the cotton fabric folded double to test your thread tension. the seams will have to be good tension wise especially when making a corset.

My pattern include 5/8 inch seam allowance (about 1,5 cm)
Here's a little trick.
I never mark my sew lines, I just simply measure the distance of the seam allowance from my needle position and mark this with a piece of crepe tape.
(as shown in the picture below.)


Now all you have to do is follow the line of the tape when sewing the pieces together..

Easy!

Let's continue...

Corset making 101: Pattern and materials

I adore corsets, ever since working on 'The Rocky Horror Show' I got really into them. And from what I found out over the years, just about everyone loves them. Now corset making is a great skill to have, and they are not all that difficult to make. I personally love making them for my friends. (see last post about Julia's corset)
So when Marieken, a good friend of mine asked me to make her a corset for her upcoming trip to the US, I naturally obliged.
And of course a very good reason to teach you all about the production of corsets.
Lets begin!

The Pattern.


For this corset I used the Laughin Moon, Dore Corset pattern which you can order on-line.
I highly recomend this pattern, it has easy to use instructions and it's beautifull.
In this case I personally altered the pattern to inlude shoulder straps.
Before I started assembling the final corset I made a mockup (toile) of the corset out of muslin fabric. and tried this on my friend Marieken. This way you can see the alterations you need to make to the pattern before you start cutting your expensive fabric.

(note: cup sice is to small on pattern, causing deformation of the breast)

Materials.

(note: the black lace is an optional decoration on this corset)

You will need:

- A stiff cotton fabric.
Preferably coutil which is specially designed for corset making. but any stiff and thick cotton will do. (In the picture this is the black fabric)
-A top fabric.
This will be the fabric and color of the outer layer, this can be every sort of fabric you want it to be. In this case, it is old pink silk.
-Eyelets.
For making the lacing holes at the back of the corset.
-Bones.

(From left to right, flat boning, busk, spiral boning + end caps)

I always use flat steel bones and spiral steel bones.
Flat steel is used for straight bone line (usually centre front or centre back)
Spiral steel is bendable and used for all non-straight bone lines
All these bone types are available in different pre cut lengths, but I like to cut it to my own specific lengths and use boning on a roll, which is sold by the meter or the yard.
In this case I will also be inserting a busk, which is a piece of boning with hooks attached. This is a closure which makes it easier for the wearer to put the corset on his or herself.

Let's continue...